crafts

Easy Valentine’s Project: Personalized Bookmarks

Easy Valentine’s Project: Personalized Bookmarks
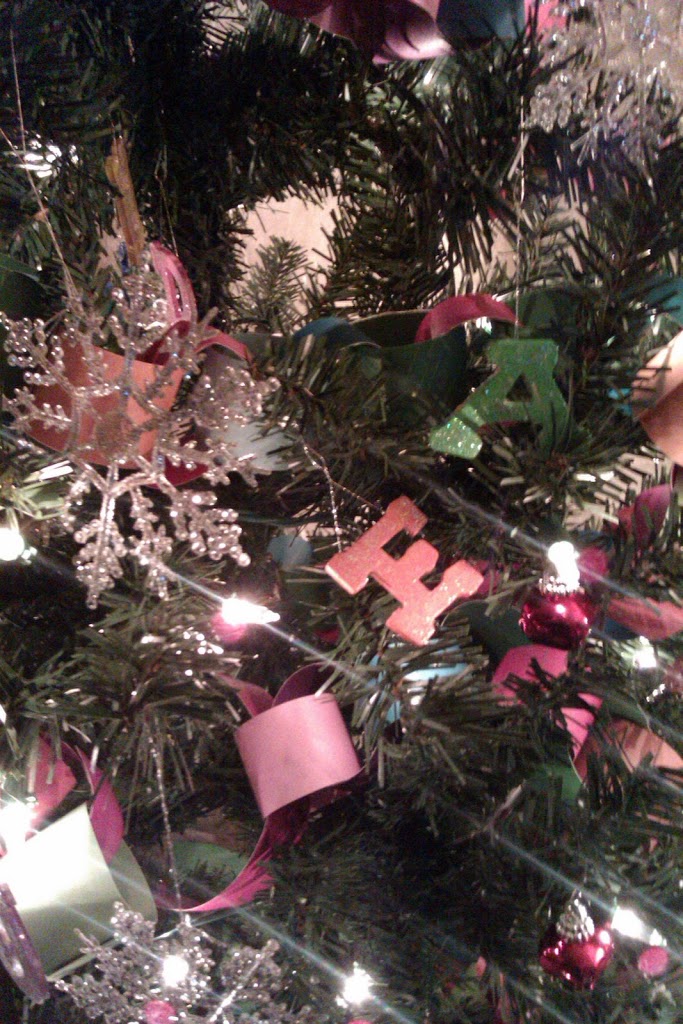
Crappy picture courtesy of my MyTouch 3G

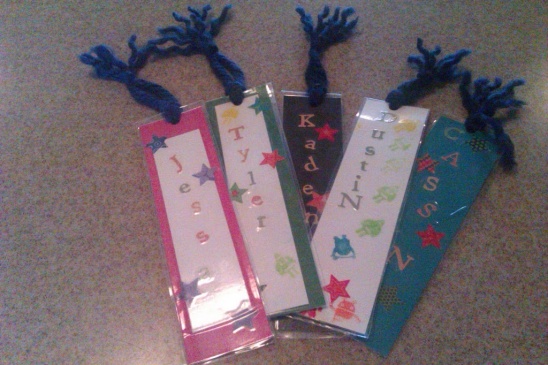
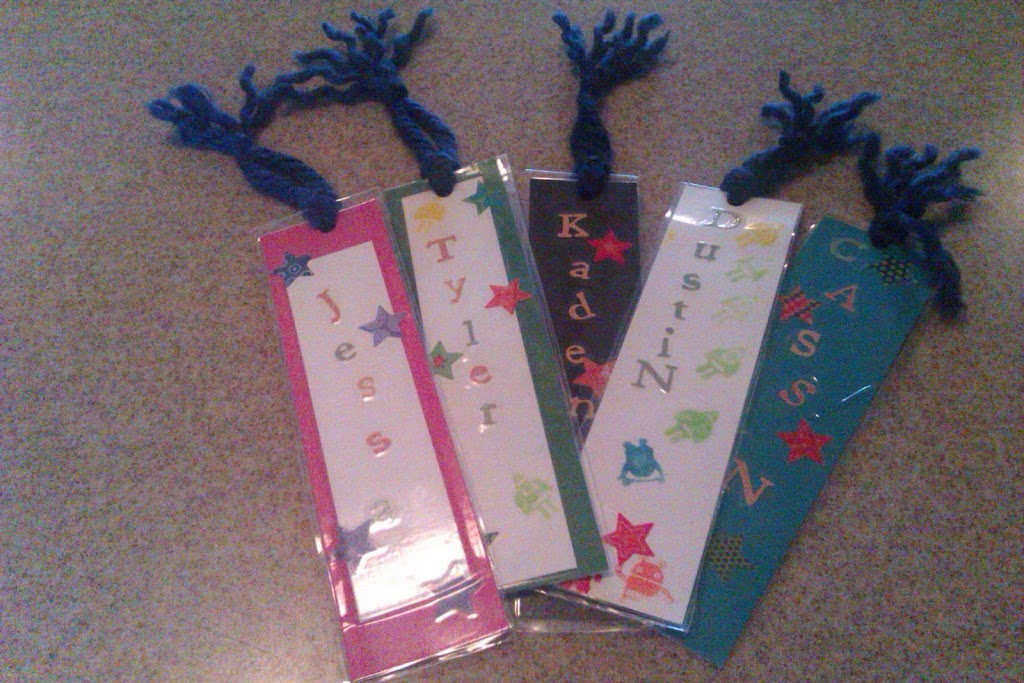
For Christmas we gave each of our nephews a book.  Since the gift lacked a personal touch Nate came up with the idea of making bookmarks for each of them. This project was so simple and the results were so well received that we’ve decided to make them for Valentine’s Day for Nate’s classmates.  It solves two problems I hate about kids’ Valentine’s Day Parties:  all the cards that you look at once and then have to throw away and the abundance of candy.  Using these as a Valentine’s Day greeting will make a card the kids can use again and is a gift that’s not candy.

I was going to get the finished bookmarks laminated at the local office supply store, but ran out of time   I came up with the packing tape idea out of desperation, but it works beautifully.  Packing tape is way cheaper than getting something laminated or even laminating it on a home machine, and it is the perfect size for a bookmark. 

You will need:

  • Card stock or old cereal boxes for a kitschy (and free!) alternative.
  • Alphabet stickers to spell each child name, a program that can pint the names vertically or good handwriting and a nice pen.
  • White printer paper.
  • Stickers.  Make sure they are flat and don’t have a texture.  You will “laminate” these and the clear layer won’t stick well on puffy or glittery stickers.
  • Crystal Clear Packing Tape for laminating the book marks.
  • Scraps of yarn to make the tassel.
  1. Cut your cardboard/cardstock into your desired length and about 1/4th of an inch thinner than your packing tape.
  2. Cut your white paper about 1/4 inch smaller on each side than your cradstock.  You can play with sizes, and eyeball it.  This certainly doesn’t have to be accurate.
  3. Add child’s name to the white paper with stickers, a printer or a marker, attach the name plate to the cardstock with a glue stick or strategically placed stickers.
  4. Pull out a piece of the packing tape twice the length of the bookmark plus about 1/2 inch.  Lay the tape down with the sticky side up.  Place the bookmark face down on the tape about 1/4 inch from the bottom.
  5. Carefully fold the top half of the tape down so that it covers the back of the bookmark.  When folding the tape over leave a 1/4 inch gap where the tape will stick to itself to leave a nice border.
  6. Smooth out the tape and trim any edges that are hanging over with scissors,
  7. Punch a hole near the top of the book mark.  
  8. Fold your yarn in half and put the folded edge through the hole and pull it halfway through.
  9. Thread the open ends of the thread through the loop over the top of the bookmark and pull them through, 
  10. Knot the yarn at the top of the book mark. 
  11. Make another knot about 1 inch down from the ends of the yarn.
  12. Pull apart each end of the yearn, separate each strand to make the tassel and fluff it up.

There you go, a super easy craft that you can do with your kids.  These aren’t just for Valentine’s and Christmas, you could use these as party favors, place markers, or gift tags. 

Star Wars Paper Snowflakes!

Star Wars Paper Snowflakes!

My awesome friend Iris shared this project with me, and now I’m going to share it with you!  Nate and I will be attempting this at some point tonight or tomorrow. These Bobba Fett/Storm Trooper and Darth Vader  snowflakes would be right at home in any nerdy family’s winter decorations! I think we are going to hang ours on the garland swag over our fireplace.  They would also make a great tag on the gift of a Star Wars fan.

Click here to get the instructions, templates and story about their creation.

If you’re not a Star Wars fan here are some instructions for traditional snowflakes.

If you found this post from Pintrest (hi, Pintrest users!) you may be interested in following Parenting Geekly on Facebook and Twitter!

T is for Tree!

T is for Tree!
The Alphabet Tree in all its pre-lit glory

Recently Kitty asked me to teach her to read. I figured it would help if she knew the alphabet – logical place to start, right? So, I went out and bought a bunch of workbooks, flash cards and beginner books and we got to work. She’s totally into it, and can now recite her ABC’s and identify many of the letters.  (As a note, the most effective tool was the one I was most reluctant to shell out for: Hooked on Phonics: Learn to Read Pre-K . All I could think of were “1-800-ABCDEFG” commercials from when I was a kid.  Anyway, it works.)

We had just sold our big seven and a half foot tree and replaced it with a much more modest four and a half foot model.  All the ornaments I had seemed over sized on our new little Charlie Brown tree, and so the kids and I were talking about what we should do.  I guess I shouldn’t have been surprised when letter obsessed Kitty gleefully exclaimed “let’s decorate it with the alphabet!”

O is for ornaments!

Aunt Karen and I made a trip to the craft store where we picked up some two inch wooden letters, some glossy acrylic paint in rainbow colors and paint on glitter (best stuff ever, the glitter is suspended in clear paint and therefore doesn’t wind up all over your house).  Over the course of the next two weeks we painted 70 tiny letters until they were shiny, gave them several coats of glitter and added silver strings.  We cut jewel-toned cardstock into strips and looped a million of them together to make a paper garland.  We took our favorite small ornaments out of the closet, opting for silver snowflakes and red jingle bells.

Our paper crafting handiwork on display.

Next we had to find a new tree topper.  My beloved art-deco style silver angel was too heavy for the top of this dinky little tree. Nate suggested getting a bigger letter, but Super Dad pointed out that putting a giant “F” monogram on top of the tree might suggest “Tree Fail”, or something worse.   We opted for an almost cartoonish looking white blown glass star with rounded edges.  It’s completely perfect.  Last week we blasted the The Andy Williams Christmas Album (a tradition in our family since my dad was a little boy), made some hot cocoa (and some Jell-o shots!) and put it all together.

The jingle bells and silver snowflakes were the only “old” ornaments to make the cut.

I’m in love with this tree.  It’s so cute, with it’s preK-meets-Martha-Stewart vibe.  The time we spent planning and making the ornaments was so much fun, and each member of the family helped. I also love teaching Kit her letter of the day, and having her run to the tree to find it!  It’s an extra way to get her excited about learning to read!

resell seo